Tuesday, December 11, 2012

Oats Almond Chocolate-Chip Cookies


Back to back second sweet post! Hmm.....After all, it's the holiday season we are talking about..:) This is a wonderful idea for an edible holiday gift for your friends and family! Make sure you double or even triple the batch, if you are gifting them because you might gobble them even before packing them as a gift...:)

These chewy gooey cookies are super simple to make and you almost can't resist eating them when they are warm and just right out of the oven. They are filled with goodness, right from the flavor to the nutrition. The oat and the almond flour provides you the protein and the chocolate chips does their part of providing antioxidants without sacrificing the taste..:) If you keep the sugar part to minimum, (which I always do) eating a cookie in the morning in your breakfast, is not at all a bad idea.

These cookies make a great portable edible holiday gift...!


Of course I can't take credit for this delicious recipe. It goes to Richa of VeganRicha.

Ingredients-:
Makes 16-18 about 2 inch cookies.
  • 1/2 cup raw almond flour
  • 1/4 cup almond milk( add few tbsp more if you feel that the dough is dry and doesn't come together.)
  • 1 cup oat flour
  • 2-3 tbsp of lightly packed brown sugar
  • 3/4 th tsp baking powder
  • A pinch of salt
  • 1 tbsp virgin coconut oil.( optional if you want chewier cookies)
  • Chocolate chips- as many as you want (I used vegan chocolate chips from Whole Foods.)
  • Cinnamon powder- 2 tsp ( Any spice of your choice , ginger powder would also be great in this cold weather.)
Method-:
  • In a bowl, mix almond flour, oat flour, salt, sugar, baking powder and the spices of your choice. Mix well.
  • Add almond milk and coconut oil to the mixture and mix everything together for about couple of minutes until the mixture gets all wet and forms a slightly sticky dough. The mixture should also be sticky at the same time.
  • Chill the dough for 10-15 minutes in the refrigerator.
  • After 20 minutes, remove from the fridge and If the dough looks dry and doesn't come together, add a tsp of almond milk.roll the dough into balls, shape them like a cookie and then place them on a baking sheet lined with parchment paper.
  • Preheat the oven to 350 degrees F and bake for about 17-19 minutes depending how big you have shaped your cookies. 
  • Cool ( if you can wait that long..:))and enjoy!!


Sunday, December 2, 2012

Raw Almond Cacao Truffles


It will be almost a month since I have posted a  new recipe! I have been just cooking and cooking and not getting enough time to actually sit and type in front of computer. As a result I now have too many drafts sitting back there. I decided to break the long break with this delicious Raw Almond cacao Truffles. Vegan, delicious chewy brown balls are so fun to share this holiday season!

Since the holidays are in the air, I have been cooking a lot of sweet stuff lately. Not everything is worth landing up on the blog, since I have been experimenting a lot.

These cuties are our this year's holiday favorites and  I will be making at least  2 more batches before the holiday season ends just because they are so simple to make and are guilt-free at the same time. Almonds, cacao powder, dates and almond milk that's it!!

Let's dive in-:

Ingredients-: Makes about 24 pieces
  • Raw almonds- 2 cups
  • Medjool Dates(Deseeded)- 12  Soak them for 15 minutes
  • 4-5 tbsp of Almond milk or any non-dairy milk
  • 1/4th cup of cacao powder
  • A pinch of salt.

Method-:
  • In a food processor, blend in the almonds, salt and cacao powder to a fine flour like consistency.
  • Add the dates and blend well by pulsing. 
  • Add almond milk or the milk of your choice so that the mixture starts to come together.
  • With the help of small spoons drop the mixture on to a parchment lined baking sheet and freeze for 30 minutes.
  • Remove from freezer and roll into round balls and then coat with the cacao powder.
  • You can store in the refrigerator for upto 1 week if they can last that long..:)
  • Serve at room temperature.

These truffles are going to Let's party- eggless bakes and treats, also linking CookCookandCook, and Thoushaltcook and also to grand festive feasts.

Thanks to my dear friend Swapna for the nice serving platter!


lets party - logo


Friday, November 9, 2012

Raw Mango with Chana Dal / Kairichi Dal


Raw mango is definitely not in season, but I found a really nice green raw mango at whole foods last week and couldn't resist myself from buying. On my way home I was thinking about delicious Kairichi dal( Raw mango with chana dal) that my mom used to make in summer. I am a big fan of raw mango, not the one we get here but the one that I used to eat back in India. Really tangy and tarty! Yum!!!
Without thinking twice, I came home and soaked chana dal and waited  for four hours to get started.:)

Ingredients-:

  • 1 cup of chana dal soaked minimum 4 hours.
  • 1/2 cup of shredded raw mango
  • 1 green chilli- chopped
  • 1 dried red chili
  • 3 tbsp of shredded fresh coconut
  • Few springs of cilantro
  • salt to taste
  • 1/2 tsp sugar
For tadka/ tempering
  • Oil-1/4th cup
  • Mustard seeds- 1 tsp
  • Cumin seeds- 1 tsp
  • Turmeric- 1/2 tsp
  • A generous pinch of asafoetida
  • 5-6 curry leaves
Method-:
  • Drain the soaked chana dal and pat it with a paper towel to get rid of most of the moisture.
  • In a blender, add the chana dal, green chilli, salt sugar and blend well.
  • Add the shredded raw mango to the chana dal mixture and keep aside.
  • Tadka/ tempering- In a kadai add oil, when heated add mustard seeds, cumin seeds, asafoetida, turmeric and curry leaves and dried red chilli. Turn off the heat.
  • Pour the tadaka over the chana dal mixture and mix well.
  • Sprinkle the chopped cilantro and shredded fresh coconut over the dal and serve.
Note:
  • Since the dal is raw make sure you add a generous pinch of asafoetida to make the dish easy on your stomach. Also make sure to keep the portion right (light)..:)
  • Also I have noticed that the raw mangoes you get here are not much sour in taste. So if you think, that you need the dal to be more on the sour side, please increase the quantity of raw mango.

Tuesday, November 6, 2012

Split Pea Soup with Baby Kale


What a perfect cloudy day for a hot bowl of split pea soup and a crusty piece of bread! I don't think I need anything more from life at this moment. Just finished reading a book called Practicing Mind by Thomas M. Sterner. Extraordinary book that talks about living in present moment and enjoy all the small and big joy that each moment brings to us. Decide your goal, keep the focus on it, but don't think that achieving the goal would be the only thing that make you happy, rather enjoy the process of reaching toward the goal while living in every moment on the path. A must read you all!

I always have great time updating and posting my recipes here on my space, but more than that I enjoy taking pictures and adding them to my post. Here is one of such pics.

Here is how they look before jumping into pot!

As promised yesterday (my FB followers would know) here is a post while we all await for the election results!

This is a kind of recipe that you can work on while you watch CNN/ MSNBC or any of your fav news channel today. 

Here is what you will need-:
  • 1/2 cup organic split peas( it would be great if you can soak them for a couple of hours. If you don't have time you can use them as is.)
  • 2 cups of organic vegetable broth
  • 2 cups of organic Baby kale
  • 1/2 medium onion - chopped
  • Garlic- 2-3 cloves
  • Extra Virgin Olive oil- 1 tbsp
  • All spice- 1 tsp
  • Bay Leaf- 1
  • Jalapeno- 1 cut into small pieces
  • Turmeric- 1 tsp
  • Juice of 1/2 lemon
  • Paprika- 1-2 tsp
  • Herbamare- to taste ( use it instead of salt. If you have never used it before, you should give it a try. It's a sea salt with a nice blend of organic herbs and vegetables)
  • Vegetables of your choice- carrots, mushrooms, bok choy etc.
  • Water as needed.
Method-:
  • In a large pan, put Extra virgin olive oil. After it gets heat up add chopped onion and saute it for a minute and then add the garlic and bay leaf.
  • In a minute add turmeric and jalapeno. Then add veggies and saute for about a minute. Add washed soaked split peas. If you haven't soaked them already, take it into account that you might have to cook them longer than if you would have soaked them.
  • Add vegetable broth and some water if needed. Bring everything to a boil, lower down the heat and simmer for about 20 minutes until the peas get cooked. 
  • Add in the super food- baby kale and mix well. Also add all spice, herbamare to taste and some more water or vegetable broth if it is too thick for a soupy consistency.
  • Give a nice mix and let everything come together for 2-3 more minutes.
  • If you want you can use a hand blender to puree the soup. Pour a few ladles aside and then puree the remaining soup and mix both together to get a nice consistency. For me I love the heartiness of the soup and like it as is.
  • Ladle into a bowl and serve with a crusty bread...YUMM!!!

While the discussion/ polls heat up, ladle yourself a nice hearty bowl of this soup and a bread to go along! Having said that let me go back to the news and hope for the best next 4 years ahead as last 4..:) Fingers crossed!!!


Thursday, November 1, 2012

Spooky Pumpkin Chocolate Bundt Cake


My first successful vegan cake ever! Yey...!!

I am sure you all have had lots of fun trick or treating last evening just like I did..:) To make your post Halloween day a little special here goes Pumpkin Chocolate Bundt Cake for all of you!!

Okay let me first admit that I am very very bad at baking. I mean really bad..:( The reason I love to cook is because most of the times you don't have to measure the ingredients and you can just eyeball stuff and adjust according to taste. I have always been cooking this way. After I started writing this blog, I got a little serious about measuring only because I realized that someone else (reader) other than me is probably going to try the same recipe. And so I had to be careful and responsible about what I put here.
Most of my friends or relatives who are good at baking have opposite point of view. They think baking is easiest, and there is no way you can go wrong with it. I attempted some serious baking but...no luck until this one...:)

Without further delay here are the ingredients-:
All Purpose Flour- 3 cups
Sugar- 2 cups
Cocoa- 1 tbsp
Cinnamon- 2 tbsp
Nutmeg Powder- 1 tsp
Cloves- 1/2 tsp
Salt -1 tsp
Baking soda- 2 tsp
Pumpkin puree- 1 can
water- 1and 1/2 cup
Vegetable oil- 1/2 cup
White Vinegar- 2 tbsp
Vanilla extract- 2 tsp

Glaze-:
Powdered sugar- 1/2 cup
Pure Maple syrup- 1/4th cup
Almond milk/ soy milk- 1 tsp
Cinnamon- 1/2 tsp

  • Preheat oven to 350 degrees
  • In a large bowl add all the dry ingredients. Flour, sugar, cocoa, cinnamon,nutmeg, cloves, salt and baking soda.
  • In another bowl whisk together pumpkin puree, water, oil, vinegar and vanilla.
  • Mix the wet mixture into dry until thoroughly combined.
  • Grease the bundt pan and pour the mixture into it and bake for about an hour. It took me an hour and 10 minutes. So check in an hour and let it sit in oven for few more minutes if needed.
  • Place on a cooling rack after letting it hang in the pan itself for a few minutes.
  • Mix the glaze ingredients together and pour over the cake.
Recipe Source- Veronica's Cornucopia.


Have A Nice Day Everyone!!


Saturday, October 27, 2012

Quinoa-Oats crusted pizza with guacamole- edamame hummus topped with simple veggies!


I am calling it as a leftover pizza. For the dough I used Savory Coconutty Quinoa  that I cooked a day before, the spread was minty guacamole-edamame hummus and the toppings are any veggies of your choice. I used tomatoes, onions and green peppers.
I added about 3/4th cup of oats to coconutty quinoa and just grinded the everything before spreading it for the base. Add more oats if you feel the batter is still on the loose side. Also I added some more spices like garlic, garam masala and some more salt to taste.


Here is how the whole thing looked. A little more browned than I expected
This recipe is totally inspired from my lovely friend's blog.....Richa.. she writes at VeganRicha. For the whole month of October, she is super busy in making different types of pizzas crusts and spreads and toppings. Check her blog out. It's awesome. Some of my favs are -
  • Thanks Richa for sharing all the great pizza recipes! You always inspire me to cook more and more and more..:)
DS loved it so much that only half of the whole left for me and DH..:)

Tuesday, October 16, 2012

Minty Guacamole-Edemame Hummus


Skip the garbanzo beans this time and make some delicious flavorful, colorful hummus with avocados, edamame and few springs of mint! Delish!!!
Use it as a dip or just spread it over a toasted whole wheat bread, you can also spread it over pizza or even a burger...really the options are endless.
Here is Sun dried tomato pesto that I posted earlier, which can also be enjoyed like hummus.

I will be posting quinoa+ oats crusted pizza spread with hummus as my next post. Take a peek into it.:)


quinoa+ oats crusted pizza spread with hummus topped with onions, tomatoes and peppers


Here is what you will need to make this hummus-:
  • 1 large Avocado
  • 1/2 Lemon juice
  • 2 tbsp cumin seeds powder
  • Springs of cilantro
  • Frozen thawed edamame
  • 1 small tomato
  • 3 tbsp of olive oil
  • 3-4 big cloves of garlic
  • Few springs of mint
  • Salt to taste
Method-:

_Chop the avocado,mash it and add lemon juice, cumin seeds powder, salt to taste. 

_Mix everything well and sprinkle cilantro on top which makes your guacamole. Set aside.
_In to a blender add chopped garlic, edamame, olive oil,  tomato, mint and salt. Blend well.   
  Add water if you need to adjust the consistency.Mine needed about 1/2 cup of water.
_Mix guacamole with this blended mixture of edamame. Taste.
_Adjust the seasoning as per your taste. You can add freshly ground black pepper, just for a 
  kick.
_Ready to be relished!


Friday, October 12, 2012

Pumpkin Puris (Bhoplyache gharge)


Chillier days and darker evenings, nice red, golden leaves, pumpkins everywhere, the ghosts and witches and spiders and bats peeking from every house! Oh..I love it. The fall is here..:)

Pumpkin has to be in your grocery list around this time of the year. It's that time of the year!!
These puris go very well with my Green Tomato Chutney, Matar Kurma or Scrambled tofu cauliflower. If you are looking for some rice to go with it, you can try Masalebhat- spiced rice. These sweet puris and Masalebhat really go very well together in one meal.

These puris are headed to Cuisine Delights Monthly Event- Festive Food and Kid's Delight potluck party

Here is what you will need for these gorgeous puris-:
  • 1 cup pumpkin puree either canned or fresh, I made my first batch with fresh and the next one with canned puree. The pictured puris are made from canned puree.
  • 1/2 cup jaggery/Gul grated
  • 2 cups of whole wheat flour
  • 1 tbsp Semolina/ rawa/sooji
  • 1/8 tsp nutmeg powder
  • 1/2 tbsp Fennel Seeds/ Badishop
  • Oil to deep fry the puris- Canola oil/ peanut oil is an excellent choice.
_In a pan mix pumpkin puree and grated Jaggery and turn on the flame.Keep it low and keep stirring the    
  mixture.
_Keeps the mixture stirring until jaggery melts down properly and add nutmeg powder.
_Allow the mixture to cool down.
_After the mixture cools down, add 1/2 a cup of wheat flour and start kneading the dough.
_Add Semolina, fennel seeds and mix everything well.
_Keep adding the rest of the dough until it becomes not to soft and not to stiff. About moderately soft 
  consistency.
_Cover the dough and let it sit for about 15 minutes.
_Divide the dough after 15 minutes into tennis ball size rounds.
_Roll each ball into flat round and deep fry them in hot oil.
_After they cool down, store into air-tight container.
_These puris have a very good shelf life, can be easily stored for about8-10 days. Which means they are 
  great if you are travelling.

Enjoy the colorful fall you all!


Monday, October 8, 2012

Savory Coconutty Quinoa!


Excellent as a one pot meal- full of protein(Quinoa), good fat (coconut milk), vitamins and minerals(veggies)!
  • 1/2 cup Quinoa
  • 1 cup vegetable broth
  • 1/2 cup broccoli- cut into florets
  • 1 carrot dices
  • 8-10 green beans chopped
  • 1 tsp coconut oil
  • 1/2 can of coconut milk
  • Red chilly flakes- optional if you want more heat
  • 2 tsp curry powder
  • 2 tsp cumin powder
  • Salt to taste
_Add coconut oil into a pan and let it heat. Then Add chopped veggies and toss together.
_Cover the pan and let the veggies cook for a minute or two.
_Wash the quinoa and add to the pan with all the veggies.
_Mix well and add cumin powder and curry powder.
_Now add the coconut milk, cumin powder and curry powder and salt to taste. 
_Mix well and bring everything to a boil. Keep uncovered on medium heat for about 12-15 minutes or until all the liquid gets absorbed.
_Turn the heat off and cover for 5 minutes.
_Fluff up with a fork and serve hot.


Wednesday, October 3, 2012

Beet-Yogurt Dip- Dairy free, vegan recipe!


This recipe is a vegan version of a traditional Mahrashtrian recipe called Beetachi koshimbir/ Beet Raita.
  • 1 medium sized Beet- cooked, peeled and grated.
  • 1/2 cup coconut yogurt/ soy yogurt
  • 1 tsp cumin powder
  • 2 tbsp roasted peanut powder(danyache kut- Dry roast the peanuts, transfer to a blender and blend) 
  • Salt to taste
  • 1 small Chopped chilly(optional, if you need a little bit of kick)
  • A few strands of Cilantro for garnishing

-Mix everything together except Cilantro
-Taste and adjust the ingredients as needed.
-Top it off with cilantro.
- Enjoy with a crusty bread or good old pita chips!


Saturday, September 29, 2012

Stir Fried Kale with Caramelized Onions


Are you all looking for one more recipe that calls for Kale? Here it is- try eating this side dish with Bhakari(Indian flat bread) or Poli/ chapati (Other kind of Indian breads )or with rice.  The caramelized onions gives the dish a kick that goes well with the Kale, making it more palatable. 

All you need is-:
  • A bunch of kale- Chopped
  • A big onion sliced
  • Ginger and garlic paste
  • Peanut Oil for tempering- 1-2 tsp
  • Cumin seeds
  • Mustard seeds
  • Asafoetida- hing powder
  • Turmeric
  • Salt to taste
  • Red Chilly powder
  • Amchur powder

Method-:
  • Add  Peanut oil into a pan and let it heat well.
  • Add mustard seeds and cumin seeds, after that goes in asafoetida. Then add the sliced onions, saute them on low flame.
  • After a minute or so, add turmeric powder and let the onions caramelize on a low flame. Caramelizing is a process of slowly cooking for long time, which pulls out natural sugar in onions and the end result is intensely flavorful and richly brown in color.
  • Once the onions get caramelize( it took about 15 minutes for me, but it depends on how low your flame is) add the ginger and garlic paste and mix everything well.
  • After a couple more minutes add the chopped kale and mix well. The kale will start to wilt down. Add  red chilly powder, amchur powder and salt.
  • Let all the flavors come together. Cover the pan until all the kale wilts down. Turn off the heat and done..:)


Wednesday, September 19, 2012

Entering into my thirties with juicing..:)

It was my 30th Birthday a few days back. I never thought that I will ever finish a glass full of green color! 
Now I can't believe that I spent 30 full years without this glass filled with all the goodness that my body always was asking for! (Almost screaming for..:(..)


I was very surprised with  the end result. It wasn't the best tasting juice ever (I won't lie.) But it is something that I can get up to every morning probably for rest of my life..:)


This is what I added in my first attempt of juicing!
The next day I added celery, and the next day I replaced celery with cucumber. You can experiment with it as much as you want. The options are endless and you don't really have to be creative for that. Just add one type of fruit and add any greens and other vegetables of your choice. What a great way to get your daily dose of nutrients in just one glass. Much better than popping that Multivitamin pill into your mouth!
So those of you who are afraid of getting started with juicing(like me), just take my word and dive into it. You will be happy that you took the first step.

I am glad that I realised the power of nutrients while entering in my thirties (Better late than never....right?)

HAPPY JUICING!!

Saturday, September 8, 2012

Pasta with Veggies Topped with Vegan Cheese


You will need-:

  • Whole wheat pasta
  • Vegetables of your choice- I used carrots, broccoli, mushrooms, and sun-dried tomatoes
  • Extra virgin olive oil - EVOO
  • Daiya cheese- I used mozzarella style shreds
  • Black pepper- freshly ground
  • Salt if needed- I don't usually need salt when there is cheese in any preparation. So check the taste  after you add the cheese and then decide.

Method-:

  • Prepare the pasta as per package instructions. Drain it and keep aside. 
  • Pour some EVOO in a pan, when it heats up, add veggies except sun- dried tomatoes and saute them until they get just cooked.
  • Then add cooked pasta  to it and mix everything. Keep everything folding in for a couple more minutes.
  • Time to add sun- dried tomatoes and then the delicious dairy free Daiya cheese. 
  • Turn off the stove and mix together.
  • Serve and savor every bite..:)
HAVE A FUN WEEKEND EVERYONE!

Friday, August 24, 2012

Oven Baked Plantain Chips


Ready for something crunchy this weekend? How about Oven Baked plantain chips!! Easiest to make won't take much time. Great healthy alternative snack for all those chips lovers out there! You control the spices and the oil content and enjoy completely as per your taste.

Here is how I  made my batch.

Ingredients-:

3 plantains
Coconut oil
Salt
Black pepper- freshly ground for an extra kick


And here is how to make them-:

  • With the help of vegetable peeler peel the plantains from all sides.
  • Slice them thinly with the help of slicer/ mandolin.( Before slicing dip the tip of plantain into coconut oil, remove and start slicing them, it helps prevent sticking while slicing.
  • In a bowl, mix coconut oil, salt and freshly ground black pepper and the plantain slices. You can also add some chilly powder if you like, or may be paprika or anything else that you feel like adding .Coat well and keep aside. 
  • Line the baking pan with aluminium foil and spray with some oil. 
  • Start spreading the plantain slices in single layer on the baking pan.
  • Slide the baking pan into a preheated 350F oven  for about 30-35 minutes.
  • If you have a couple of baking sheets make sure to rotate them and also flip the banana slices halfway through.
  • Bake them until golden and crunchy... and don't forget to savor every bite..:)

Monday, August 20, 2012

Banana Oat Cranberry Bars


This was my second attempt at making these cereal bars! And I promised myself that I will never buy them from the store ever again. The fun with any kind of homemade food is that you can completely alter it to your taste and this is exactly the reason that I keep attempting , sometimes getting better, sometimes not so much! I totally enjoy the whole process and the results is not what I look forward to anymore.

First time I made them for our Bay Area trip and this time was for the Vancouver weekend get-away!
They are easy to carry as a snack anytime you travel. They have a good shelf life. I think they should last for 2-3 days even in the bright sun. My kid loved it, and munched on it at least twice both the days of our trip..:)

Here is what you will need-:

  • 1/4th cup Almond milk or soy milk
  • 1/2 cup brown sugar
  • 1tbsp flax seed
  • 1/4th cup coconut oil
  • 1tsp vanilla extract
  • 2 medium ripe bananas
  • 1/3 cup of cranberries/ pumpkin seeds etc.
  • 2 tbsp of Chia seeds soaked overnight into 2 tbsp of almond milk/ soy milk
  • 1.5 cups of regular oats
  • 1/2 cup unsweetened coconut
  • 1/2 tsp cinnamon powder
  • 1/4th cup whole wheat flour
  • 1/2tsp baking powder
  • 1/8 tsp salt
Method-:
  • Preheat the oven to 350F.
  • Combine sugar, flax seed, almond milk , coconut oil, vanilla extract and whisk together.Keep aside.
  • Mash bananas with a fork and stir into wet mixture. Also add cranberries, pumpkin seeds, soaked Chia seeds.
  • In other bowl, mix all the dry ingredients.(Oats, wheat flour, shredded coconut, flax seed, cinnamon powder, baking powder and salt)
My little helper- mixing the cranberries and eating half of them while mixing..:)
  • Add the wet mixture to dry mixture and mix.
  • Line a baking sheet with a parchment paper and spray lightly with a canola oil spray.
  • Scoop out on to the pan and press firmly making it even.
Serious work is in progress, no jokes please...!
Before jumping into oven!
  • Bake at 350F for 35- 40 minutes.
After popping out of the oven!
  • Let it cool and slice into bars. It will make about 10 bars depending on how thick you spread the mixture. The first time I made them, they came out to be 10. This time I think I spread them a little thinner and they came out 12 with more crunch to them because of the thinness.

Sunday, August 12, 2012

Roasted Brussels Sprouts


Oh...that smoky flavor of these tiny little green Brussels Sprouts is just worth eating rather than describing!
It's a great recipe to enjoy on the BBQ day.

Here is what you will need-:

Brussels Sprouts
Olive oil- about 2 tsp just enough to coat the sprouts in.
Paprika
Salt
Black pepper- freshly ground.

You can certainly alter the spices as per your choice.

Method-:

  • Heat the oven to 375F
  • Cut the Brussels sprouts in half.
  • In a bowl mix olive oil and rest of the seasoning/ spices.
  • Add the Brussels sprouts into the bowl and mix well so that every piece will get coated very well.
  • Line the baking sheet with aluminium foil and spread the Brussels sprout on to the baking sheet. Arrange so that they form a single layer and do not overlap.
  • Roast for about 10-12 minutes. Check if they are done and have burnt just enough to give you that smoky taste.
  • Turn them if needed and bake for another 5 minutes or so. Keep checking.
Enjoy!!!

Thursday, July 19, 2012

Homemade Granola


Nothing like crunchy granola in your cereal or as a yogurt topping or just as a snack on the go.Super easy and super fun to make your own granola! Once in a while I do buy from the store but most of the times I prefer to make my own. You can totally customize it to your taste. Considering my son's allergies, I find it easy to make my own instead of reading labels on the back of the granola pack. That way I have the whole control over what's going in and I also get to modify it the next time if I don't like what I added this time. Super flexible isn't it?

Here is what you will need-:

  •  3 cups of rolled oats
  • 3/4th cup agave
  • 4 tbsp water
  • 1.5 tsp vanilla extract/ almond extract
  • 1/4 cup sesame seeds
  • 1 cup of mixed dry fruit- I used dried blueberries and golden raisins
  • 1/4 cup of sliced almonds
Feel free to add anything else you like. Chopped walnuts or pecans is a great substitute for almonds. You can add dried papaya or any other dry fruit you may like.

Method-:
  • Preheat oven to 350 F. Spread the oats on a parchment paper lined baking sheet and bake for about 15 minutes. Remember to stir twice in between.
  • Mix agave, water, vanilla extract or whichever extract you are using in a bowl. Add toasted oats, sesame seeds, and dry fruits and almonds.
  • Mix well and spread over the baking sheet and bake for 15 more minutes, stirring twice in between.
  • Let it cool and munch on some while still kind of hot...:)

Just few more captures that I enjoyed clicking..:)

Let them spill a bit!!


Wednesday, July 11, 2012

Homemade Almond Milk


As I am preparing my homemade granola post(which is going to be the next), I thought I should write about this wonderful health drink, perfect for summer!

Making your own almond milk is very much exciting. I didn't know how easy it is to make your own almond milk at home and so I used to buy one from the grocer just like most of us do! Honestly this is the simplest recipe ever and the taste..oh..nowhere close to what you get from the grocer. Simply delicious..no not the brand, that was my reaction after having first couple of sips..:)

All you have to do to make this delicious milk is to soak almonds overnight in some water. About 10-12 organic almonds and about 1 cup of water. To make it thick add less water and to make it watery add more.

Next morning put the almond into the blender after straining all the water from it. Add fresh water to it. If your blender is like mine, which grinds things better if they have less water content, don't add all the water right away. Just add all the soaked almonds and then add half of the water. Let the mixture get blended well and then add remaining water and blend nicely.

Use the cheesecloth to strain the mixture and you will get a nice snow white creamy almond milk! All the residue can be thrown or you can put it to good use as a facial scrub or even whole body scrub.

Recipe for the Homemade Almond Scrub-:
  • Almond residue
  • Jojoba oil
  • Lemon zest or orange zest
Mix all the 3 ingredients and apply on the face. Leave it for 10-15 minutes and wash. Or you can simply apply the scrub in shower and get the benefits of almond and the orange zest. Sorry I don't have the pic for the scrub. I will upload the pic when I will make the scrub again. The scrub should be good in the refrigerator for 2-3 days in a glass container.

Enjoy sunny afternoon with a glass of homemade almond milk with couple of cubes of ice and without all the horrible additives that are in the store bought milk!!


Sunday, July 1, 2012

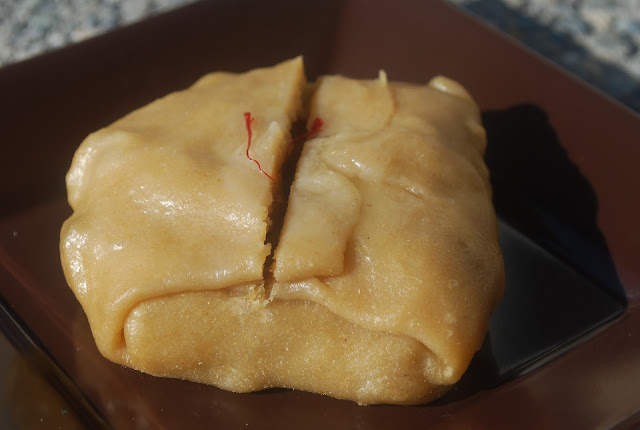
Dind- Steamed Wheat Wrap with Split Chana Dal Stuffing


A classic Maharashtrian ( A state of India where I grew up) recipe which is made on the occasion of Nag Panchami. For me, I don't wait for any occasion to celebrate great food! I usually make these for breakfast on any relax weekends. The recipe is not too hard but it takes some time to prepare the filling that goes inside the wheat dough.

Ingredients-:
  1. 1/2 cup whole wheat flour
  2. 1/2  cup jaggery, crushed or shredded
  3. 1/2  cup split chana dal
  4. 1 tbsp oil
  5. pinch of salt
  6. 1/4th tsp Cardamom powder
  7. Earth Balance butter 
  8. A few strand of saffron to garnish.
Procedure-:

For the Stuffing-:
  1. Pressure cook the chana dal with 1:3 ratio. For 1/2 cup of chana dal add 1 and half cups of water. After the dal gets cooked strain it through the strainer and remove all the water from it.
  2. In a pan mix in the dal and the jaggery and start cooking the mixture on a medium heat.
  3. Keep stirring continuously as it can stick to the bottom easily. Mix it until the mixture becomes thick. Add cardamom powder. Mix and turn off the stove.
For the Dough-:
  1. Add salt to the wheat flour. Heat the oil  and add very hot oil into the dough. You should see the flour getting frothy after you add the hot oil. Add water and make a little harder dough than you usually make for roti.
Putting things together-:
  1. Divide the dough into nice round balls.
  2. Roll into thin round shape.
  3. Put about 1 tbsp of filling onto the rolled out dough.

    4.  Fold 2 sides of on to top of the filling.

    5.  Fold remaining 2 sides over the previous fold. Please see the picture below.


6.  I used electric steamer to steam the Dind, but you don't need to have steamer. You can simple put a big pan with some water in it. When the water comes to boil put a colander or any stainless steel pot  and line it with a thin cloth. Place the dind into the pan and cover and steam for about 15 minutes .

7.  Make sure that you don't put them on top of each other. Traditionally the ghee is used to top it off. It melts over the hot dind. But I tried pouring some earth balance butter since I was trying to find the vegan substitute and it tasted nice. Finally top it off with couple of strands of saffron to add some color...:)

Variation for the filling-:
  1. You can add some chopped nuts into the filling . I like to add sliced almonds. They give a nice bite to the filling.
  2. You can also try and add some shredded coconut. Lightly dry toast the coconut and then add it to the filling.

Have a great week ahead!


Thursday, June 7, 2012

Varanfal/ varanphal (Chakolya)


If you are like me who likes hot one pot meals you will love today's post. This is a great nutritious one pot meal, providing carbs, proteins, fat all in one bowl. Oh Yes, you need good fat to loose fat!

This is a typical maharashtrian dish(Maharashtra- the state where I grew up). Growing up, my mom never made this dish, because no one at my home used to like it. I remember I tasted it at one of my friends home, but didn't like it then. After I got married, my mother in law made this and I fell in love with Varanfal(also known as Chakolya).

As this dish needs a little bit more time than just pressure cooking a simple daal and rice, weeknight is not very ideal for me to cook varanfal. I usually reserve it for the weekend lunch, when all of us enjoy this delicious hot bowl.

Varanfal is nothing but a rolled out roti of whole wheat flour with some spices, cut into squares or diamonds and then dumped into hot dal. Dal is made up of some more different kind of spices and tomatoes. Basically you can visualize it as wheat dumplings in a daal soup. The key is not to roast the roti, just roll it and toss into the daal.

So let's get to the ingredients and then to it's method!

Ingredients-:

For the Dough-:


  • Whole wheat flour
  • turmeric powder
  • Red chilly powder
  • Ajwain seeds
  • Salt
For the Daal-:
  • Cumin seeds
  • Mustard Seeds
  • Methi seeds
  • Curry leaves
  • Green chillies
  • Turmeric powder
  • Chopped garlic
  • tamarind pulp
  • Jaggery
  • Salt to taste
  • Oil- peanut/ safflower
  • Ghee

Method
  • Pressure cook the toor daal and keep it ready
  • Add spices for the dough in the whole wheat flour, add water and salt, kneed and keep aside.
  • Put some oil or ghee in a big kadai/ pan.
  • When oil gets hot add, cumin and mustard seeds and methi seeds
  • As they splutter, add asafoetida, curry leaves and chopped garlic.
  • Saute for about a minute or so, until the garlic gets nice golden color.
  • Add green chillies and pour in the cooked daal that is kept aside.
  • Add water and mix well.
  • Add chopped tomatoes, red chilly powder, goda masala(kala masala) coriander powder and salt to taste
  • Add tamarind paste and jaggery and mix well. Let the daal simmer on low heat.
  • Roll the dough by dividing into small sized balls( about the size of a golf ball)
  • Roll the ball very thin and then cut into diamond or square shape.

  • Drop the squares into the cooking daal.
  • After you add the squares/ dumplings adjust the water as desired. The mixture gets thicker as you continue to cook. Add more water, if you feel that it's getting lumpy.
  • Mix well, cover and let it simmer for about 10 minutes. Let the dumplings get cooked well.
  • Pour into your bowl and garnish with some chopped cilantro and a dollop of ghee on top.
Enjoy the delicious meal!!